This may be of use to others out there with an RNS 510 satnav unit fitted to VW’s and Skoda’s. I had an issue where the media page would not show music files located on the HDD and navigation mode kept prompting to insert the maps DVD, but if I went for a drive and let the unit warm up a bit, I would find it would start working again. However in the winter it would take longer and longer for it to start working.
Finally I got so fed up with this I started doing some research and came across a great forum post here.
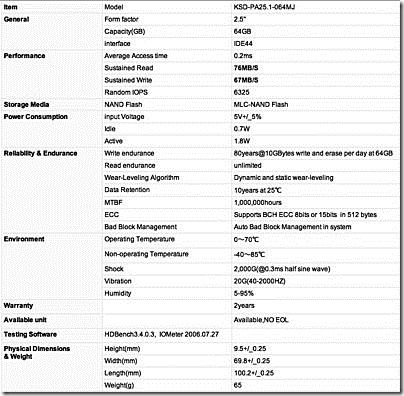
Turns out quite a few people have replaced the built-in 30GB HDD with a 64GB SSD. I purchased one from Amazon (spec here – mine is a KingSpec SSD, if you can’t find the exact model make sure you get one that is “PATA” not “SATA” – you need one with a traditional old fashioned IDE interface). They don’t have much stock left and it does come all the way from China, so expect to wait a few days for delivery. If you can’t find them on Amazon, then try ebay. In the forum at VW Watercooled, the post said you basically have to reload the firmware and maps in order to get the RNS to repartition and format the SSD. However I noticed some people had reported problems so I thought I would try skipping this step by cloning the HDD onto the SSD.
When the SSD arrived, the first problem I had was plugging it into my PC – actually the SSD and 30GB HDD are laptop style 2.5” drives, so have a smaller 44 pin high density IDE connector than what is present in older PC’s that support 3.5” IDE drives. So I got a couple of adaptors, again from Amazon here but also available on ebay, and this enabled me to plug both the 30GB HDD and SSD into my PC’s IDE connectors.
The first thing I noticed is the SSD did actually have an NTFS partition on it, I did wonder if this was the cause of other peoples problems, so deleted it using Windows Disk Management applet in MMC. Another problem was getting my PC to recognise the 30GB HDD. The BIOS did recognise it but when booting up the PC reported a hard disk error. I don’t think it was spinning up and could be symptomatic of the cold start issue I was having when in the car. I laid it on a radiator for 15 minutes to let it warm up and sure enough this was enough to get it working.
With the HDD now working, I used Acronis True Image to create a backup image that I stored on the PC’s internal HDD (drive C), then I restored this image onto the SSD.
I put the RNS all back together and it’s working a treat! The only problem is that the partition sizes have been retained so the media partition is only about 13GB in size and there’s about 30GB of wasted space on the SSD. What I am hoping to do is repartition it at some point in the future using a hacked version of the firmware, but I am still researching this. I did try several partitioning tools to see if I could repartition the drive before putting the RNS all back together again, but none of the tools I tried could resize the media partition (the first partition on the disk). I think it might be because they didn’t recognise the file system so didn’t dare touch it. I probably could have tried something like gparted but to be honest it was 2am at this point and I just wanted to wrap up so will re-visit this another time.
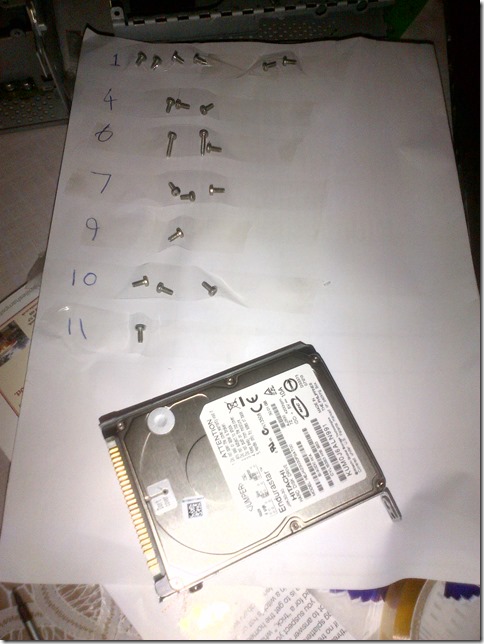
The post in the forum showing how to take the RNS apart was really helpful, my little tip is for each step to stick the screws to a piece of paper with sellotape and note the step number, so you know which screws go with each step. Here’s mine:
Here’s my RNS in bits:
I was really quite impressed with the design and construction of the unit, especially the way multiple PCB’s stack up and connect together. Also the tolerances on the parts are very good so it all fits together really neatly. It’s basically a very well designed and engineered product, and you can understand why they are so expensive to replace when you compare it with a cheap Chinese Android head unit.
I found the post at VW Watercooled so helpful, I have decided to reproduce it here with some of my notes attached (prefixed by PR>). I have also re-hosted the images on my blog platform as I noticed they had gone missing in the past when the original poster left the community. So this is really my way to help preserve this knowledge. As these RNS units get older, more and more people may start suffering from the cold start issue and may start looking how to replace their hard drives……
STEP 1
Make sure the area you work in is clear of dust. Have some soft foam padding ready for when you remove the screen. Avoid anything that creates lint.
-
Remove 2 x T8 screws from top of unit
-
Remove 2 x T10 screws from side of unit. There are only 4 of these T10 screws in the job. Don’t mix them up with your other T8 screws.
-
Repeat step 2 for the other side.
STEP 2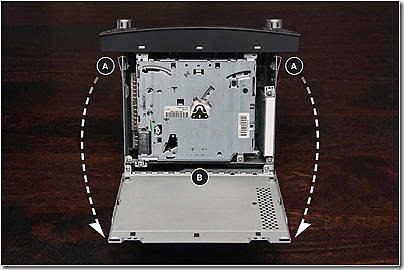
Remove top cover plate by pulling up at point (A) and work the hinge at point(B).
STEP 3
Carefully drop screen down as shown. The screen is connected with data ribbon in 3 locations. Pull the beige ribbon locks outwards to release the ribbon. There is no need to disconnect the DVD drive ribbon (A). Move the screen in foam aside while you do the rest of the job.
PR> Be vary careful in this step, the screen will literally fall off if you are not careful as there are no screws attaching it to the chassis at this point. I didn’t realise this and the screen fell off and pulled the ribbon cables out before I had had a chance to release the locks. NOTE, each ribbon cable socket has a little collar that pulls forward or up, these lock the ribbon cable in place, release these first before pulling out the ribbon cables. And when you re-insert them later, make sure of close the locks to secure the cables in place.
PR> One of the connectors is not a ribbon as such but a small white plastic connector, it is quite hard to get out and the plastic is quite soft to be careful not to chew it up with a screw driver or whatever tool you use to prize it apart – you may just be able to tug on the cables to pull the connector out.
-
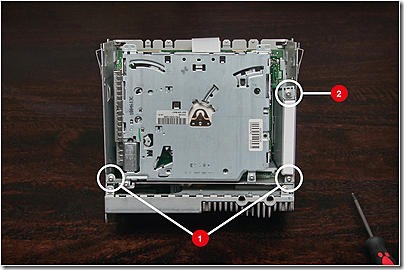
Remove 2 x T8 screws from DVD drive mounting bracket. Aternatively, you could undo the 2 T8 screws that mount the DVD drive to the bracket.
-
Remove the 1 x T8 screw which secures the HDD mounting bracket to the exterior cover.
STEP 5
Lift out the DVD drive, and flip it over to access the 2 ribbon locks. Unplug both ribbons as you did in Step 3.
PR> There’s another one of these white plastic connectors here so again be very careful when prizing it apart.
STEP 6
Remove the 1 x T8 screw from the rear of the heatsink. Then remove the 2 x T8 screws which are down inside the heatsink. The two arrows in the picture highlight their location. This is one of the reasons behind the long reach T8 driver.
STEP 7
Remove these 3 x T8 screws from the rear of the heatsink. Then remove the 2 x T8 screws which are down inside the heatsink (PR> these are actually the same 2 screws mentioned in step 6).
STEP 8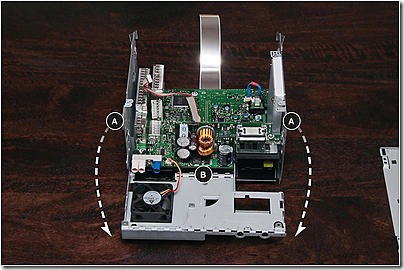
Drop down the rear cover plate in the same way you removed the top cover plate in Step 2. Disconnect the cable for the fan and remove the plate from the hinge.
-
Remove the 1 x T8 as indicated.
-
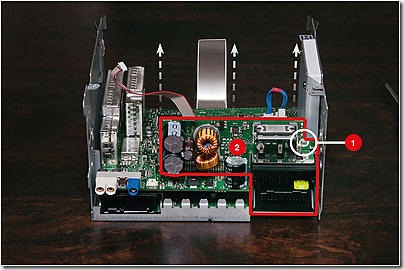
Carefully lift the card (red highlight) in an upward direction. The card is plugged into the upper circuit board and may resist a little. See Step 10 to see what the card sits in. Just try to lift it evenly, and also pay attention to the opposite end of the card as is needs to be guided up between 2 metal prongs. These prongs can be seen in Step 11.
-
Remove the 3 x T8 screws from the board.
-
Straighten the 2 tabs (as shown) in order to lift out the upper circuit board. Lift it out and pay attention to any places where it may catch on the existing frame. It needs to be done at a bit of an angle to clear the 4 screw tabs towards the rear of the left and right cover plates.
PR> I didn’t realise this, but in the upper right corner of the pic, the PCB is actually connected to the bottom PCB via a connector underneath the board, so when you lift the PCB out you just need to be aware of this connector coming apart (and the gentle force it needs to disengage) instead of yanking it really hard and damaging something!
STEP 11
Once the upper circuit board is out of the way, you need to remove the 1 x T8 from the HDD mounting cover bracket. You can then carefully lift the HDD directly out of its plug in an upward direction.
STEP 12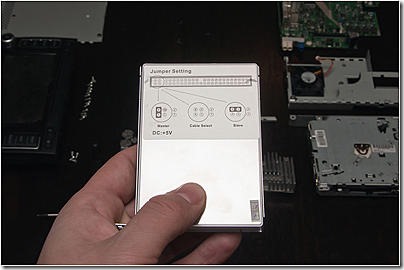
Once removed, undo the 4 screws from the HDD mounting plate and replace it with your new drive. I’ve replaced this one with a 64GB 2.5” SSD IDE PATA MLC. Depending on your firmware version, this will either give you a 40GB music drive (2 partition firmware) or a 30GB music drive (with new 3 partition firmware). Remember to remove the jumper on your new SSD drive. You cannot insert the HDD with a jumper in place.
STEP 13
Reverse the procedure and you’re done. Double check all of the ribbon connections along the way. Plug it into your car, load your firmware+maps and check that everything is working as it should.
After it’s all back together and plugged in, you’ll need to install the firmware and then your maps to get the drive working.
After some recent developments by kamold, it is now possible to change the size of the partitions on the drive. For more details, visit: How to re-partition the HDD in your RNS510
PR> I haven’t done this yet as the post seems to refer to a much older version of firmware than what I am running, so I’ll need to do a bit more research before trying this.





The paltry 13GB for music started bothering me so I did try using a custom firmware with a different partitioning scheme from http://www.rnsfirmware.com/27/ which would have given me about 44GB, however I kept getting a SWL load error. It’s probably the CD I’ve burnt but in the end I just reloaded the firmware I used in my firmware upgrade post and now have approx. 30GB free for music. That’ll do for now.
Great, well done for putting this all in one place. I’ve decided to go for a 128gb SSD. Fingers crossed it’ll all work well
My issue isn’t storing music but the speed of the unit at startup as well as the major lag when I do just about anything other than use the radio. Can any of you tell me after the SSD upgrade, was startup speed an improvement and if so, was it drastic?
It does feel a little quicker but I wouldn’t say drastically. I believe the limitation may actually be with the data transfer speed over the PATA interface than the actual speed of the drive.
Would a ide to sata adapter allow us to use a sata drive? I have a spare 64gb Kingston sata drive laying around and I figure it’ll allow this pos rns510 with a 13gb hdd to boot faster. If I turn my car on and let the engine warm up until it idles and then put my car in reverse it still takes another 10 seconds for the reverse mode camera to show up on screen. Forget about navigation that takes an additional 30 seconds to load
I just did the exact same process as you on my 2012 Eos (HW: H10 SW:1040). And I got the Kingspec 128gb SSD. Like yours, it came with the drive formatted as NTFS, which is really dumb IMO. Anyway, since I have the US version, I am a bit lost as to how to find a firmware upgrade that is capable of re-partitioning the HD. I have firmware 1140, (which I thought was the latest for the US version), but I am not sure. The 1140 upgrade disc doesn’t contain a step to re-partition the drive at all. So, I am now stuck with the original partition size from the 30gb drive.
I did plug it in to gparted, and it can read the 2nd partition with the nav data on it, which is FAT32, but it doesn’t recognize the file system or partition type on the first partition. I tried 2 other windows based partition managers with the same result.
Any idea how to resize that partition?
Hi Geoff,
I still haven’t got around to fitting mine. My plan was to mirror the original drive on my pc. place partitions on new drive in fat32 and paste mirrored files in correct partitions.
But, as I say, not got around to it yet.
Hope to soon.
Regards
Julian
My hdd in my rns 510 is dead dosnt spin so inhave bought a new hdd can i just upload the firmware on to the new one before i put it back in the unit ?
Easiest way is to clone it
I cant clone it as it dosnt work , plugged it into my computer and it wont access it
Ah right, you’ll have to install a new drive and load the firmware from CD/DVD then, this is so that it partitions and formats it correctly, see my other post about doing a firmware upgrade.
Hello, my friend fucked up his RNS 510 bad, so i’m trying to help him. He wanted to update software in it, but problem battery was low and it shutdown in middle of upgrade, after it he couldn’t start his device. After that he tryed many things, which even included to format HDD from device (really don’t know why he tryed that), anyways is there any solution to fix it? Maybe to find some other RNS510 and to copy files from that HDD to his? Or something else? And while i searched on google for this problem i found that he could easy fix problem with that recovery cd if i’m right? But that won’t work now after he formated HDD. xD Sorry for bad english hope you understand what i meant and someone can help, thanks.
Try the recovery CD, my HDD failed and the unit still worked, so you don’t need a working HDD for these things to power on. Your firmware is likely corrupted and it just needs to be reloaded, use the recovery CD and let us know how you get on. Good luck!
Problem is that i can’t even pull his CD, it’s like eject not working, so even i pull somehow CD i doubt i could put recovery one in. And i tested his mehanic (or however is that part called where CD are stored) and it’s working. But when i try to power on his device it barely working, i see low lights on display but that is all, no any color change, nothing is writen, etc. When i press setup+eject+star it glow red for couple of sec and then back to low light again. Really don’t know what i could do more, seems he really killed it.
does somebody already had the problem that the fan stopped working?
My RNS 510 with Premium 7 on it to a crap. Welcome to VW come on then goes off after about 5 secs. worked one day , not the next. What causes it?? I have read the threads, I am not that savvy, Could someone do it for me?
I would like to share with you my experience, first thank you to Paul for his summary and notes, and my notes : After try many clone software (include Acronis True Image) only this one have worked : Paragon Backup & Recovery, perfect job and reading of the disk (the others : only one partition viewed, or for acronis and others : big issue at the end or at the middle of the read of disk), the RNS is OK now, excellent to start it and get immediately music and map..
https://polldaddy.com/js/rating/rating.js
Hello, I have a broken HDD in my RNS 510 and I triyed to replace it by a new Kingspec SSD but when I plug my RNS in my car, it starts, but I can’t launch a firmware installation and I can’t eject the CD, it just spins. When I put back the old broken HDD, everything works again. Does somebody had the same issue ?
I also triyed to wipe the SSD, but got same the result.
Hi there, I get the same problem with the same replacement SD drive, I have tried cloning it with all types of software, and also making sure it’s completely blank with no partitions and I get the same as you, it takes in the firmware disk and does nothing with it and you cannot eject it, if I put the old drive back in the firmware disk boots. Did you find any reason why this happens?
I have an rns 510 P and i want to change te drive.
Is there a size maximum you can place?
oke, now i am stuck.
I have an rns 510 p hw 10 sw 5269 but when i put the drive in, i cant put firmware on the device.
it is very very slow, even loading setup application is take 4 houers.
what can i do?
Thank you for the instructions! I was not very careful when removing the power loom and i broke an IC and a resistor flew off 😦 i was able to find a replacement part on aliexpress WOOT WOOT!!
Bit of an old post now, but struggling to find a decent PATA (IDE44) SSD for this project. Wondering if anyone has had any luck with ro tried mSATA to IDE44 housings?
Yes, i used one made by “Renkforce” with a transcend 230S 64GB drive, works for over a year now.
I create clone with acronis true image
But my rns510 doesn’t recognise the SSD.
HELP PLEASE
Paul… Thank you for an excellent article. It was very helpful and I have created a resource to help others. It is at https://www.rns510.ca/upgrades.php I hope it also helps others as much as you have helped me. Rudy Boonstra, Calgary, Canada
Hello My RNS 510 is not working well temporarily works for a minute and shutdown even is not recognized by the gateway, what is the problem
Could you just remove the HDD? or will this stop the whole unit from working?? just wondering as my radio is german and not giving any sound and i dont save music to the HDD anyway
Replaced the 8 year old SDD for a new one as the unit had often issues starting. Tried without cloning first, but the firnware update procedure failed at 6% HDD update (same as many other report). Disassembled it again, cloned the old SSD to the new SSD, reassembled it and now the RNS510 works fine (Used AOMEI to clone -> backup to image and recovery from image function)
Hello,
I have an RNS510 – 7E0035680A
It worked well for a long time until one day it frozen and all the menus went to german language and the unit would not work properly.
So…I couldn’t do anything (updating, uploading firmware, etc) so I thought the HDD had failed.
So I bought a new drive, updated the firmware to 5238, no errors, the unit would start normally but would not use the new HDD.
Navigation data doesn’t stored and I no longer have music storage capability.
I even have firmware 4120 but the result is the same.
The new HDD is not being recognized.
I also have a SSD PATA but I’ve seen other people have trouble installing so I thought I would made the normal HDD work and then go for the upgrade.
Any hints?
Any help is appreciated
Hello,
The HDD will only be recognized if it has the correct partitions. As these partitions are not standard, the best option is to clone the HDD from the old HDD/SSD.
In my first attempt I did not clone the SSD and just left it blank. The RNS does not see it. I just looks like you have a RNS without SSD/HDD.
You could use AOMEI to close the disk. It worked for me.
Good luck,
Roland
Hi there, i want to Replace my HDD in RNS 510 with a SSD!
I have one question, following this post, can i install a fresh software, without cloning my actual HDD? And then eventually to upgrade to the latest version?
Because i have some error, because my navigation keeps restarting itself. And i want to install a fresh software, if it’s possible.
all t8 screws looks like the same (except 2 long one)